pseudo element selector का इस्तेमाल element की एक विशिष्ट भाग को style करने के लिए किया जाता है |
Syntax
selector: :pseudo-element {
property: value;
}
pseudo element को : : चिह्न के साथ लिखा जाता है |
Pseudo Element Selectors List
- : :first-letter
- : :first-line
- : :selection
- : :placeholder
- : : after
- : :before
- : :marker
1) first-letter pseudo element
इस selector के जरिये element के पेहले अक्षर को style करने के लिए इस्तेमाल किया जाता है |
<html>
 <head>
  <title>pseudo-element tutorial</title>
  <style>
    p::first-letter{
		  color:red;
		  font-size : 30px;
		  background:yellow;
		}
    h1::first-letter{
		      font-family: Arial;
		      color: white;
		      background:blue;
                     }
  </style>
 </head>
 <body>
  <div>
   <h1>Pseudo Element Demo</h1>
   <p>first paragraph</p>
  </div>
 </body>
</html>
output
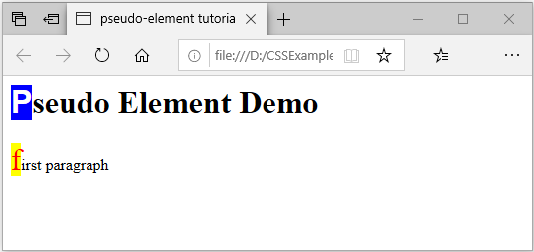
ऊपर के उदाहरण में आपने देखा paragraph और h1 tag के content की पेहली अक्षर को style दिया गया है first-letter pseudo element के जरिये |
2) first-line pseudo element
selector में उस element के पेहली line को style करने के लिए इस्तेमाल किया जाता है | जैसे कोई paragraph या कोई बड़ी text line है, और उसकी पेहली line को style करना है, तो first-line pseudo element के जरिये किया जा सकता है |
<html>
 <head>
   <title>pseudo-element tutorial</title>
    <style>
      p::first-line
	{
	  color:red;
	  font-size : 25px;
	  background: yellow;
	}
     p{
	 margin: 40px;
     }

    </style>
 </head>
 <body>
   <div>
     <p>Lorem Ipsum is simply dummy text of the printing and typesetting industry. Lorem Ipsum has been the industry's standard dummy text ever since the 1500s, when an unknown printer took a galley of type and scrambled it to make a type specimen book.</p>
   </div>
 </body>
</html>
आउटपुट

आउटपुट में आप देख सकतें हैं की paragraph की पेहली line को style किया गया है, जिससे उसका font और background color अलग लग रहा है बाकि के line से |
3) selection pseudo element
किसी paragraph या बड़ी text content में अगर कुछ text को select किये mouse click के जरिये और उसे कुछ style देना चाहते हैं की कोनसा हिस्सा select हुआ है | तो selection element का इस्तेमाल किआ जाता है | जिससे फिर text और आकर्षित होकर highlight होती है |
<html>
 <head>
   <title>pseudo-element tutorial</title>
    <style>
      p::selection
	    {
	       color:#fff;
	       background: purple;
	    }
	p{
	    margin: 40px;
	}
    </style>
 </head>
 <body>
   <div>
     <p>Lorem Ipsum is simply dummy text of the printing and typesetting industry. Lorem Ipsum has been the industry's standard dummy text ever since the 1500s, when an unknown printer took a galley of type and scrambled it to make a type specimen book.</p>
   </div>
 </body>
</html>
output
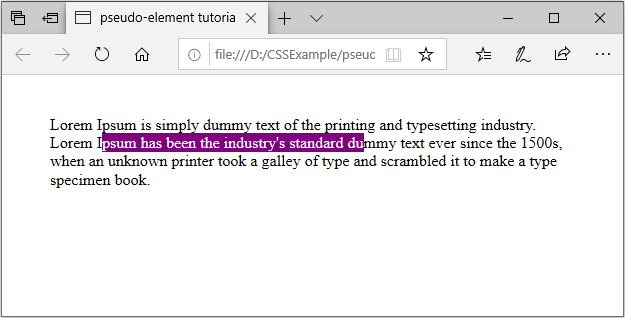
ऊपर के paragraph में जितना text हमने select किया उसे background-color purple और text color white देके आकर्षित बनाया गया है | ऐसे ही आप अलग अलग style दे सकतें हैं अलग अलग element selection पे | और अगर पुरे वेबपेज में एक जैसा selection style देना है तो सिर्फ selection element लिखना होगा बिना किसी element के साथ जोड़े |
उदाहरण:
<style>
::selection
{
color:#fff;
background: purple;
}
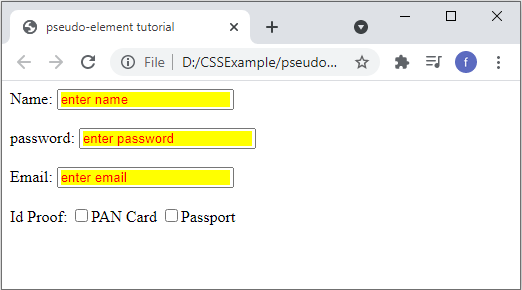
</style>4) placeholder pseudo element
किसी webpage में input text field में placeholder का इस्तेमाल होता है | जिससे user को बताया जाता है की क्या data input करना है | और data डालते ही वो placeholder हट जाता है | placeholder pseudo element के जरिये placeholder को देखने में और ज्यादा आकर्षक बनाया जा सकता है |
उदाहरण
<html>
 <head>
   <title>pseudo-element tutorial</title>
    <style>
      ::placeholder
	{
	 color:red;
	 background: yellow;
	}
    </style>
 </head>
 <body>
   <form action="">
        Name: <input type="text" placeholder="enter name" /><br><br>
	password: <input type="paasword" placeholder="enter password" /><br><br>
	Email: <input type="email" placeholder="enter email" /><br><br>
	Id Proof: <input type="checkbox" name="idproof">PAN Card</input>
        <input type="checkbox" name="idproof">Passport</input>
   </form>
 </body>
</html>
output
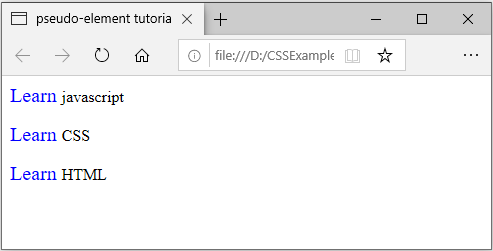
5) ::before pseudo element
element के content से पेहले कुछ और content लगाना है तो before pseudo element के जरिये किया जा सकता है | इसके अलावा कुछ खास style देना है या कोई अलग image लगाना है बिना किसी extra tag इस्तेमाल किये | तो ऐसे में before pseudo element काफी उपयोगी होता है |
<html>
 <head>
   <title>pseudo-element tutorial</title>
    <style>
      p::before
      {
        content:"Learn ";
        font-size:20px;
	color : blue;
     }
   </style>
 </head>
 <body>
   <p>javascript</p>
   <p>CSS</p>
   <p>HTML</p>
 </body>
</html>
output
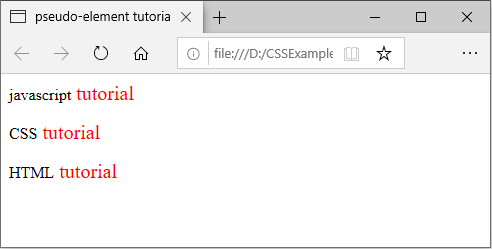
6) ::after pseudo element
element के content से बाद कुछ और content लगाना है तो after pseudo element के जरिये किया जा सकता है |
उदाहरण
<html>
 <head>
  <title>pseudo-element tutorial</title>
  <style>
   p::after
   {
     content:" tutorial";
     font-size:20px;
     color : red;
   }
 </style>
 </head>
 <body>
   <p>javascript</p>
   <p>CSS</p>
   <p>HTML</p>
 </body>
</html>
output
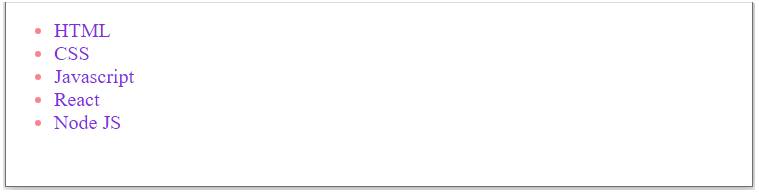
7) ::marker pseudo element
marker pseudo element के जरिए list items को style कर सकतें हैं |
उदाहरण:
<!DOCTYPE html>
<html lang="en">
<head>
    <meta charset="UTF-8">
    <meta name="viewport" content="width=device-width, initial-scale=1.0">
    <title>Marker Pseudo Element Demo Example</title>
    <style>
        ::marker{
            color: rgb(247, 133, 139);
        }
        li{
            font-size: 20px;
            color: blueviolet;
        }
    </style>
</head>
<body>
    <ul>
        <li>HTML</li>
        <li>CSS</li>
        <li>Javascript</li>
        <li>React</li>
        <li>Node JS</li>
    </ul>
</body>
</html>
output