
HTML Form Tag in Hindi
HTML Form user से जानकारी लेने के लिए इस्तेमाल होता | जैसे आप कोई फॉर्म देखे होंगे जिसमे नाम, पता और अन्य जानकारी भरी जाती है | उसी तरह की webpage बनाने के लिए HTML में फॉर्म टैग <form> tag का इस्तेमाल होता है |
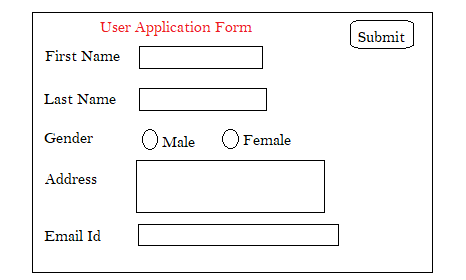
form application का उदाहरण
एक html form कई सारे elements के समारोह से बनता है | यूजर के जरुरत के हिसाब से कई इनपुट एलिमेंट फॉर्म में होते हैं | Input elements जैसे text, checkbox, radio button या फिर upload file आदि elements हो सकते हैं | जिसके बारे में हम इस आर्टिकल में आगे पढेंगे |
*एक html page में एक से ज्यादा form भी रख सकते हैं | पर एक form के अंदर दुसरे form को लिखी नहीं जाती है |
Form Syntax:
      <form>
          ..form elements..
      </form>
form tag को <form> से सुरु की जाती है और </form> से बंद की जाती है | form elements वो सारे elements हैं, जो एक form बनाने के लिए जरुरत होती है |
<form> tag में कई तरह के elements लिखी जाती है |
पर उनमे से मुख्य elements है: 1) <input>, 2) <select>, 3) <button> tag
input tag <input>
User से डाटा लेने के लिए input tag का इस्तेमाल होता है | जिस तरह का डाटा लेना है उसे input tag में type attribute से बताया जाता है |
data किस तरह का है वो बताने के लिए type attribute का इस्तेमाल होता है | अगर text के format में data लेना है तो type में text लिखा जाता है | और अगर यूजर को बिकल्प चुनने देना है, तो type attribute में radio या फिर checkbox लिखी जाती है |
उदाहरण :
<input type=”textbox” />
<input type=”radio” />
<input type=”checkbox” />
<input> textbox type
Text वाले डाटा केलिए textbox element का इस्तेमाल होता है | एक लाइन वाला text लिखने के इस type को इस्तेमाल किया जाता है | और इसमें 20 character तक लिखा जा सकता है |
syntax: <input type=”textbox” />
<input> password type
आपने देखा होगा किसी login form में या फिर sign up form में user id और password डालने का option होता है | जहाँ password, hide होके रहता है | html page में password लेने के लिए और उसे सिर्फ सिंबल से दिखाने के लिए password input type का इस्तेमाल होता है |
syntax: <input type=”password” />
<input> radio type
radio type वहां पे इस्तेमाल की जाती है जहाँ कई options में बस एक चुनना होता है | जैसे लिंग में male या female चुनना हो |
radio button में सारे बिकल्पों को एक ग्रुप में रखा जाता है ताकि कई बिकल्पों में से सिर्फ एक बिकल्प चुनी जाए | इसके लिए name attribute का इस्तेमाल होता है |
syntax:
<input type=”radio” name=”groupname” />
उदाहरण:
Gender:
<input type="radio" name="gender">Male</input>
<input type="radio" name="gender">Female</input>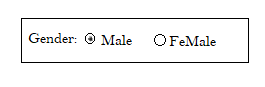
<input> checkbox type
एचटीएमएल में चेकबॉक्स क्या है?
checkebox type का इस्तेमाल कई बिकल्प चुनने के लिए इस्तेमाल किया जाता है | जैसे application form में id proof के कई options होतें हैं जैसे आधारकार्ड,पानकार्ड, या पासपोर्ट | तो एक से अधिक बिकल्प चुनने के लिए checkbox input type लिया जाता है |
checkbox में सारे items को एक ग्रुप में रखने के लिए name attribute का इस्तेमाल होता है |
syntax:
<input type=”checkbox” name=”groupname” />
उदाहरण:
Id Proof:
<input type="checkbox" name="idproof">
   PAN Card
</input>
<input type="checkbox" name="idproof">
   Passport
</input>
<input type="checkbox" name="idproof">
   Voter Card
</input>
<input type="checkbox" name="idproof">
   Driving License
</input>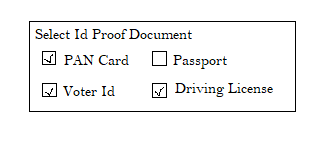
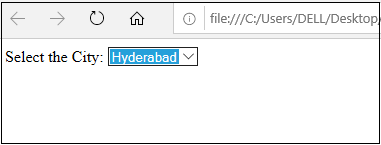
<select> type
एचटीएमएल में select tag का इस्तेमाल user को एक साथ कई सारे options का dropdown देने के लिए इस्तेमाल होता है |
उदाहरण के लिए एक form में कई सारे city की लिस्ट को दिखाना है तो, वो select tag से दिखाया जा सकता है | ये एक dropdown list बनाता है जहां यूजर अपने पसंद का बिकल्प चुन सकता है |
dropdown बनाने के लिए <select> tag का इस्तेमाल होता है और उसमे item list देने के लिए <option> tag का इस्तेमाल किया जाता है |
syntax:
<select>
<option>..itemlist..</option>
</select>
उदाहरण
Select the City:
<select>
   <option>Hyderabad</option>
   <option>Bengaluru</option>
   <option>Chennai</option>
   <option>Delhi</option>
   <option>Mumbai</option>
</select>
आउटपुट
<optgroup>
एक जैसी options को एक group में दिखाने के लिए <optgroup> का इस्तेमाल होता है | बड़ी dropdown में <optgroup> के जरिये related options को manage करना आसान होता है |
उदाहरण
Country Name:
          <select>
             <option>Kenya</option>
             <optgroup label="Asian Countries">
                <option>India</option>
                <option>China</option>
            </optgroup>
            <option>USA</option>
            <option>WestIndies</option>
            <option>Japan</option>
          </select>
textarea type
form में text data लेने के लिए input text type का इस्तेमाल किया जाता है | पर अगर text एक से अधिक line में लिखनी हो तो, textarea tag का इस्तेमाल होता है |
उदाहरण
Comment: <textarea></textarea>यूजर से input लेने के बाद data को submit करना हो तो button type का इस्तेमाल होता है | और अगर पुरे form को reset करना हो तो, reset type का इस्तेमाल किया जाता है |
उदाहरण
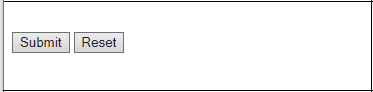
 <input type="button" value="Submit" />
 <input type="reset" />
आउटपुट
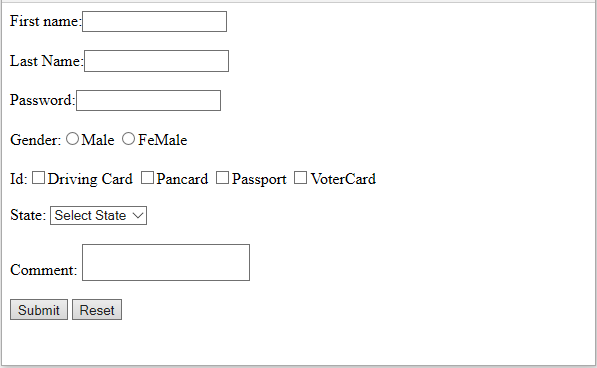
**तो चलिए अब सारे form elements को लेकर एक sample code लिखतें हैं |
<html>
<head>
  <title>Form Tag Example</title>
</head>
<body>
 <form>
   First name:<input type="text" /><br><br>
   Last Name:<input type="text" /><br><br>
   Password:<input type="password" /><br><br>

   Gender:<input type="radio" name="gender">Male</input>
          <input type="radio" name="gender">FeMale</input><br><br>

   Id:<input type="checkbox" name="ids">Driving Card</input>
      <input type="checkbox" name="ids">Pancard</input>
      <input type="checkbox" name="ids">Passport</input>
      <input type="checkbox" name="ids">VoterCard</input>
   <br><br>

   State: <select>
           <option>Select State</option>
           <option>Haryana</option>
           <option>Chhatisgarh</option>
           <option>UP</option>
           <option>Bihar</option>
           <option>Rajasthan</option>
         </select>
        <br><br>

   Comment: <textarea></textarea><br><br>

   <input type="button" value="Submit" /> <input type="reset" />
 </form>
</body>
</html>
output
Form Tag Attributes
- name : name attribute का उपयोग form tag को name देने के लिए किया जाता है |
- action : action attribute में उस page का link दी जाती है जिसे form process करेगा |
- method : data किस format में पास किया जायेगा वो इसमें बता या जाता है | इसमें दो value दी जाती है और वो है: 1) post, 2) get |